Thứ Ba, 8 tháng 12, 2009

Twitter Recent Posts Widget, The Rare Widget Ever!

1 nhận xét

Many Newbie bloggers use a JavaScript Recent post widget to there blogs but to keep your blog distinct you must either choose Feedburner or Twitter. Twitter is a nice place to attract a huge traffic if used intelligently. Adding the twitter recent postwidget will surely increase the number of your followers and indirectly the traffic to your blog. So now before wasting any more time, lets get to work!
This widget requires two things

  1. Sign up for twitter Feed


  2. A twitter account ( Which is Obvious :D )


1.  Sign up for twitter Feed

For your latest posts to be shown in twitter widget you must submit your RSS feeds to a free web service called twitterfeed  They will post your latest blog posts along with the title and description in your twitter account for free! You just sit back and relax.
This is what you need to do,
1. Visit twitterfeed 
twitterfeed
2. Create an OPen ID to sign up for a twitterfeed account

OpenId is an Id just like your blogger Id that lets you log into thousand’s of web services without the need of signing up for an account. In short its a free ticket that lets you take a complete ride of thousands of remarkable websites that accept OpenId and luckily blogger and twitterfeed  is one of them.
3. Once you have created your OpenId, log into twitterfeed Then click on the button that says Create new Feed
twitterfeed1
A form is what you will see next,
twitter-feed-form
First and foremost click at the link saying Authenticate At Twitter This will tell twitter.com whether twitterfeed  is allowed to access your twitter account or not. After authenticating, fill up the form by following the steps below,

  • In RSS Feed URL type this,
http://tnt-by-stc.blogspot.com/feeds/posts/default
Remember to replace the URL in red with your blog URL
You can also add your Feedburner Feed URL , which will look like this,

http://feeds2.feedburner.com/tntbystc
Again make sure to replace the text in red with your feed title

  • Set the Update Frequency to Every hour and Post up to to 1
  • Write your Blog title in the box next to Prefix each tweet with and check the box just below it
  • For Shorten Link through choose TinyURL
  • Finally check the box at bottom to activate your tweets
  • Hit Create and you are Done!
After your tweet feeds are activated you will see a page as shown below,
twitterfeed1
It will take 30 minutes or less for your feed status to be activated. During this time read further on how to get a Twitter widget for displaying your latest posts in it.
2. Visit twitter.com/widgets
twitter-for-blogger
You will have four options where you can add your twitter widget but since I share blogger Tips and tricks (TNT) I will go for blogger :)
Click Continue to set your twitter widget. You will come across a configuration page as shown below,select-settings-and-copy-tw
You have the choice of showing up to 20 posts on your widget but I would suggest just 5 for better page load time. I would also suggest not to give a title to this widget, we will give it a title later on.
You have two choices to add your cool looking twitter widget to your blog either by clicking the Add to blogger button or grab the code link. I love to add codes to my template myself so I will go for grab the code
Copy the code they provide you,
copy-the-code  Note:- Don’t worry about that Hot tip! I am here to take all that headache  :D
Log into your blogger account and go to Layout > Page Elements
Layout
Click on Add a gadget,
add-a-gadget
Choose HTML/JavaScript
html-javascript

Paste the code in this widget and give it a title like “Recent Posts” or “Latest Stories
And your are Done!

 Ahmedzai

Recent Posts Widget By Feedburner For Blogger and Typad

0 nhận xét

You might have seen recent post widget hanging on the sidebar of several blogs but most often this widgets have a JavaScript Code in it that badly increases the load time of your page. Today we will learn how to add a Recent posts widget offered by  Feedburner to your blogs which is tidy, attractive, unique and most importantly fast loading.
Let me tell you that Feedburner also uses JavaScript but it’s really smart when it comes to page Load time, because the JavaScript is not directly linked to your blog, 50% of the load time is shared by FeedBurner.

Feedburner Recent Posts Widget

Feedburner as you all know is the best web service for submitting your blog feed. Once you sign up with them they will provide you with several widgets like a Rotating Headlines Banner, Subscription Email form as you can see on my sidebar, a feed counter and most importantly a Recent Post widget like the one on my sidebar,
feedburner-recent-post-widg
These are steps you may follow,
1. Sign up for a Feedburner Account , which I hope you already have.
2. Log in your account and click on the Publicize button as shown below,
publicize
3. Then Click on BuzzBoost on the sidebar at your left.
buzzboost
4. On the page that opens , you will see a small form,
feed-form
Fill the form with relevant information. Leave all Boxes unchecked. Keep the number of items (Links) as low as possible. You can choose 8 links to be displayed but 6 would be better. Choose Links to be opened in Same Window
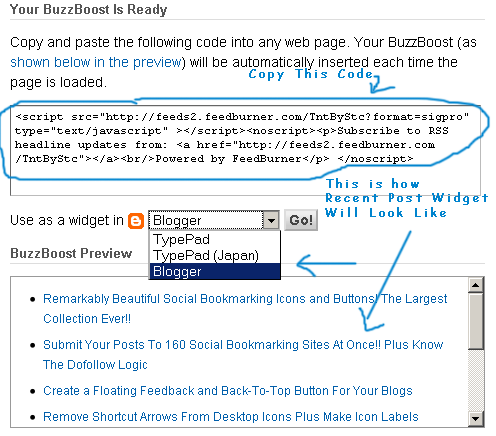
5. Now copy the code they provide you as shown below,
Copy-this-Code
6. Log in your blogger Account and then go to Layout > Page Elements
Layout
7. Select add a gadget and the choose HTML/JavaScript
add-a-gadget
html-javascript
8. Now Paste the code into the widget and give it a title “ Recent Posts”
9. Done!

Ahmedzai 


Recent Comments Widget By Feedburner For Blogger & Typad

0 nhận xét

To add the Recent comments Widget By Feedburner to your blogs follow these steps,

Burn Your Comment Feed At Feedburner

1.  Login To Your Feedburner Account. Incase if you don’t have one simply sign up for a free account.
2.  Insert your Comment Feed URL inside the Feedburner box. The URL for Blogger Blogs will be like this,

http://YOUR-BLOG-NAME.blogspot.com/feeds/comments/default
Replace YOUR-BLOG-NAME with your blog’s good name.Burn-your-feed-box
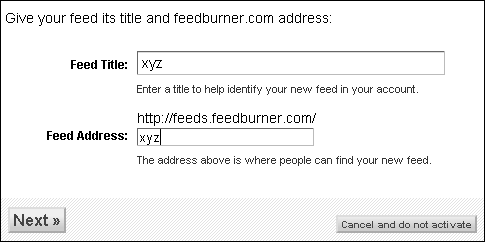
3.  Press the Next Button and you will be brought to a new page. Simply insert an easy memorable Feed title and feed address. I prefer both to be the same.
Feed-title-and-address

4.  Press Next and then fill the two options on the new page as shown below,
choose-feed-options

5.  Finally press the Next button again and you have successfully burnt your comment feed!

  • Now click the publicize button just at the top
publicize-button

  • On the left sidebar click BuzzBoost
buzzboost

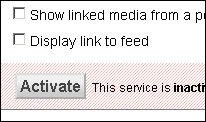
  • Hit The Activate button on the right pane
activate

  • Then fill in the options as shown below,
recent-comments-widget-sett
Its advisable to leave all boxes unchecked.

  • Finally click the save button and get your HTML code which will be just at the top of the page as shown below,
Widget-code

  • Done!
Adopt a similar procedure for Typad

How to Add the Recent Comments Widget To Blogger

Now once you have copied the code for your recent comments widget then simply follow the steps below,

  1. Log into Blogger
  2. Go To Layout
  3. Click Add a Gadget or Add a Page element
  4. Choose HTML/JavaScript Widget
  5. Now paste the Feedburner code inside this widget and hit save
  6. Done!
Finally Preview your template to see it hanging on your sidebar :>
Ahmedzai 

Multi Tab Widget For Blogger/Blogspot Blogs -Updated

0 nhận xét


Multi tab Widget is a must widget for every blog may that be wordpress hosted blog or Blogspot/Blogger. It helps to decrease the load time of a blog by combining three or more than three widgets into one! .You might have seen this widget on every blog and even on my blog (look at the sidebar) but the question is how do you add it? Well If you go and search in Google on how to add a multi tab widget to your blog you will land on various blogs with several tutorials but believe it or not, disappointment is what you will get in return. Now why is that?


This widget looks cool only if coded with CSS and JavaScript. Several blogs share different tutorials but unfortunately most of these tutorials are either very difficult to understand or they are written in a technical language that a newbie can’t understand. Moreover the codes that they offer are pretty lengthy which increase the load time of your homepage and often the widget doesn’t seem to work in browsers like Internet Explorer. And the worst part is that some bloggers who share this trick often add their blog link to the widget code and when you view that widget in your blog, at the bottom of that widget you will find this “ Widget by XYZ.com” or “Grab This Widget”. This link is surely injustice with the reader. In short give preference to anything which is easy to understand, interesting and which may give a professional look to your blog not a Grab this widget look.
Now how come my widget be very different. As I have mentioned in my About Me page that I am not an HTML or JavaScript expert but I have learnt the art of editing my template through trial and error. I read blogs day and night and when some blog catch my attention I start playing with its template via its Source File, which shows all their template coding in HTML, XML and CSS Language. Hence I have stolen many hidden and secret codes :D and thus I am ready to share those codes with you. Don’t worry I will never add a Grab this widget  link to any widget that I share.
UPDATE:-
Most of you complained that the tabs are not working/clickable. I was amazed too because this widget was working perfectly alright in all my test blogs. Then how come its not working in your blogs? Well the answer was simple than I could imagine.
This widget uses a JavaScript which is responsible for making the tabs clickable. I saved this widget in Google sites and link it to this widget. This was the mistake that I commit. Google sites offers limited bandwidth and is far slow to respond than you can imagine. Hence when you guys would add this widget to your blog, the JavaScript would not load, as a result leading to static tabs.
Fortunately I have updated this post with all necessary steps to take. You will have to add the JavaScript directly to your blogger templates. Doing this will improve the widget performance and will also reduce your page load time. This update will solve all your problems!
Follow the Steps Below,


  • Go To Blogger > Layout > Edit HTML


  • Search for  </head>              (Tip: Use Browser Search Box. Press Ctrl + F )


  • And Just above </head> paste the code below,


<script type='text/javascript'>
//<![CDATA[
function tabtampil_oom(TPID, id)
{
  var Tabtampil = document.getElementById(TPID);
  var TTs = Tabtampil.firstChild;
  while (TTs.className != "TTs" ) TTs = TTs.nextSibling;
  var TT = TTs.firstChild;
  var i   = 0;
  do
  {
    if (TT.tagName == "A")
    {
      i++;
      TT.href      = "javascript:tabtampil_ubah('"+TPID+"', "+i+");";
      TT.className = (i == id) ? "Active" : "";
      TT.blur();
    }
  }
  while (TT = TT.nextSibling);
  var Halamans = Tabtampil.firstChild;
  while (Halamans.className != 'Halamans') Halamans = Halamans.nextSibling;
  var Halaman = Halamans.firstChild;
  var i    = 0;
  do
  {
    if (Halaman.className == 'Halaman')
    {
      i++;
      if (Halamans.offsetHeight) Halaman.style.height = (Halamans.offsetHeight-2)+"px";
      Halaman.style.overflow = "auto";
      Halaman.style.display  = (i == id) ? 'block' : 'none';
    }
  }
  while (Halaman = Halaman.nextSibling);
}
function tabtampil_ubah(TPID, id) { tabtampil_oom(TPID, id);
}
function tabtampil_inisial(TPID) { tabtampil_oom(TPID,  1);
document.write('');}
//]]>
</script>


  • Save your template


Adding the code for  Multi Tab widget to HTML/JavaScript widget

The Code for Our Multi Tab Widget looks like this,
<style type="text/css">
div.TabTampil div.TTs
{height: 24px; overflow: hidden; }
div.TabTampil div.TTs a:hover, div.TabTampil div.TTs a.Active
{ background-color: #eee; }
div.TabTampil div.Halamans
{ clear: both; border: 1px solid #fff; overflow: hidden; background-color: #ffffff;}
div.TabTampil div.Halamans div.Halaman
{ height: 100%; padding: 0px; overflow: hidden; }
div.TabTampil div.Halamans div.Halaman div.Alas
{ padding: 3px 5px; }
div.TabTampil div.TTs a
{ border-left:1px solid #eee; border-right:1px solid #eee; border-top:1px solid #eee; border-bottom:0px solid #eee; float: left;
display: block; width: 95px; text-align: center; vertical-align: middle; height: 24px; padding-top: 3px; text-decoration: none; font-family: "Arial", Serif;
font-size: 11px; font-weight: 900; color: #000000}
</style>
<form action="tabtampil.html" method="get">
<div id="TabTampil" class="TabTampil">
<div style="width: 300px;" class="TTs"> <a>Tab 1</a> <a>Tab 2</a> <a>Tab 3</a></div>
<div style="width: 300px; height: 300px;" class="Halamans">
<div class="Halaman">
<div class="Alas">
<br/>
Tab 1 content goes here
</div>
</div>
<div class="Halaman">
<div class="Alas">
<br/>


Tab 2 content goes here


</div>
</div>
<div class="Halaman">
<div class="Alas">
<br/>


Tab 3 content goes here
</div>
</div>
</div>
</div>
</div></form>
<script type="text/javascript">tabtampil_inisial('TabTampil');</script>
Things To Note:
#eee : This is the background colour of the Tabs. The Default one is grey. If you want to change it to a different colour of your choice then use MBT Embeddable Colour Chart
#fff :  This is the colour of the border of your multi tab widget. The default one is white you can customize it to a colour of your choice using the same colour chart mentioned above.
#ffffff : This is the background colour of the main body of your widget. This is where you will add content to the widget. The default one is white. Use MBT Colour Chart if you wish to use a different colour.
#eee : This is the colour of the borders around those rectangular tabs. The default one is grey. Use MBT Colour Chart if you wish to use a different colour.
#000000 : This is the colour of the text/font that you will write to name your tabs. In other words, it’s the colour of your tab titles. The default one is black.
Replace these with your tab titles
Tab 1 , Tab 2  , Tab 3
Replace these with your widget codes.

Tab 1 content goes here , Tab 2 content goes here ,  Tab 3 content goes here
Here goes the codes of your content/widgets, which can be your recent comments widget, recent posts widget, any written text, a picture etc. For example, to add a recent comments widget to the first tab, name Tab 1 as Comments and replace Tab 1 content goes here with the HTML code of your recent comments widget.
Adding the Multi Tab Widget To your Blog
After you have customized the code, do the following,


  • Log into your blogger account


  • Go to Layout > Page Elements


Blogger Layout Page Elements


  •  Click on Add a Gadget


add-a-gadget
  • Then Choose HTML/JavaScript Widget from the widget list that blogger provides
htmljavascript widget blogger
Now paste your customized code into this widget by leaving the title empty. Hit Save and You are Done! Check your blog to see the new dress :)

That’s All!


Ahmedzai


Thứ Bảy, 5 tháng 12, 2009

Flash Animated Label Cloud Widget For Blogger

0 nhận xét


"Blogumus" is an Flash based tag cloud widget which uses scripts converted from Roy Tanck's WP Cumulus plugin for Wordpress. I fell in love with Roy's original Cumulus plugin when I saw it, and simply had to learn how to convert this for use in Blogger powered blogs. The result is the widget you can see in action at the top of this post. Hover your mouse over the Flash object to see the animation begin. In this post, I'll explain how you can add Blogumus to your own Blogger layout with ease!

Update: Improved Widget Code

I have updated the code required to run this widget to activate links in the tag cloud Flash movie. If you have already installed Blogumus, please replace your widget code with the new updated code, or reference the additional lines to modify your existing installation.

How it works

This widget uses a combination of JavaScript and Flash animation to parse and display your blog labels. Once installed in your template, it should work "out of the box" without any additional tweaking required, though of course you may prefer to change the variables for color, background and size if appropriate :) You should also be able to move the Label Cloud widget through the Page Elements page of your dashboard if you prefer display in a different layout location. To see Blogumus in action, both Flash and Javascript must be installed and enabled for your internet browser. However, it does degrade relatively gracefully, and label links will still be clickable (though not animated) for those who do not use JavaScript of Flash (including search engine spiders).

How to install Blogumus in your Blogger layout

Installing Blogumus in your Blogger layout is surprisingly simple! You should only need to copy and paste a section of code to your Blogger template, though any tweaks for the style of display will require some manual editing. Here are the steps required to install Blogumus in your Blogger layout: Go to Layout>Edit HTML in your Blogger dashboard, and search for the following line (or similar):
<b:section class='sidebar' id='sidebar' preferred='yes'>
Immediatly after this line, paste the following section of code:
<b:widget id='Label99' locked='false' title='Tags Cloud' type='Label'>
<b:includable id='main'>
  <b:if cond='data:title'>
    <h2><data:title/></h2>
  </b:if>
  <div class='widget-content'>

    &lt;object type=&quot;application/x-shockwave-flash&quot; data=&quot;http://halotemplates.s3.amazonaws.com/wp-cumulus-example/tagcloud.swf&quot; width=&quot;420&quot; height=&quot;300&quot; allowscriptaccess=&quot;always&quot; &gt;
        &lt;param name=&quot;movie&quot; value=&quot;http://halotemplates.s3.amazonaws.com/wp-cumulus-example/tagcloud.swf&quot; /&gt;
        &lt;param name=&quot;bgcolor&quot; value=&quot;#27408b&quot; /&gt;
        &lt;param name=&quot;flashvars&quot; value=&quot;tcolor=0xffffff&amp;mode=tags&amp;distr=true&amp;tspeed=100&amp;tagcloud=&lt;tags&gt;
      <b:loop values='data:labels' var='label'>
<a expr:dir='data:blog.languageDirection' expr:href='data:label.url' style='12'><data:label.name/></a>
</b:loop>
&lt;/tags&gt;&quot; /&gt;
        &lt;p&gt;Blogumulus by &lt;a href=&#39;http://www.roytanck.com/&#39;&gt;Roy Tanck&lt;/a&gt; and &lt;a href=&#39;http://www.bloggerbuster.com&#39;&gt;Amanda Fazani&lt;/a&gt;&lt;/p&gt;
    &lt;/object&gt;


  </div>

  <b:include name='quickedit'/>
</b:includable>
</b:widget>
Then preview your template. If installed correctly, you should see the tag cloud appear in your sidebar. Then you are free to save your template, edit the colors and dimensions as required, or move it to a different location. That's all!

Customizing Blogumus

In this default installation, Blogumus includes the following preset variables:
  • Width is set to 420px
  • Height is set to 300px;
  • Background color is white
  • Font size is "12"
If you would prefer to make your widget wider, shorter, change the color scheme, etc, you will need to do this by editing various parts of the code. I'll go through these options in the order they appear in the widget code. Editing width and height The variables for width and height are found in this line of the script:
var so = new SWFObject("http://halotemplates.s3.amazonaws.com/wp-cumulus-example/tagcloud.swf", "tagcloud", "420", "300", "7", "#27408b");
The width (currently 420) is highlighted in red, while the height (300px default) is highlighted in blue. These numerical values specify the width and height in pixels, so you can alter these of you prefer. Editing background color You can change the background color from white to any other color by altering the hex value in the same line:
var so = new SWFObject("http://halotemplates.s3.amazonaws.com/wp-cumulus-example/tagcloud.swf", "tagcloud", "240", "300", "7", "#27408b");
For example, if you prefer a bright red background, you may replace #27408b with #ff0000. Take a look at this page for a list of commonly used hex color codes. Alter the color of text By default, the text is set to display as dark grey ( hex value #333333). You can alter this variable in the following line:
so.addVariable("tcolor", "0xffffff");
Be aware that "tcolor" is a Flash variable and doesn't include the usual hash symbol of hex color codes. Be sure to only replace the numbers! Adjust the font size The maximum font size of tags is specified in this line:
so.addVariable("tagcloud", "<tags><b:loop values='data:labels' var='label'><a expr:href='data:label.url' style='12'><data:label.name/></a></b:loop></tags>");
You can alter this to ensure tags are displayed in a bigger or smaller font if you prefer by changing "12" to a larger or smaller number. While making any of these changes, you should be able to preview your widget and be certain that your new choice of color, dimensions and background are suitable for your needs.

Credits, support and requirements

Blogumus is based on the original WP Cumulus plugin by Roy Tanck, and was converted for use with Blogger layouts by myself. Please leave the credit links in the widget code intact. These will not be seen by the majority of your blog readers (as they will only display if JavaScript and Flash is not activated) but leaving these links intact is a great way of passing some link love on to Roy for all his hard work, and to inform other Blogger users that they can find the widget codes on this site.

Support/Issues

If you have any problems installing or using this widget, please leave your comments below or direct these to the Blogger Buster forums as Roy will be unable to provide support for installation in Blogger blogs!

Requirements

For Blogumus to display properly in your template, you will need to have Flash Player 7 or higher. You can download the latest Flash Player plugin for your browser from Adobe. I'm not sure that this installation will support special characters as tags (only Latin characters supported at present). If you do experiecce issues with labels displaying incorrectly, please let me know. I'll try to add more support, but have very little experience using Flash!

Your thoughts?

I hope that you enjoy using Blogumus in your own Blogger blogs! Please feel free to share or syndicate this page with your favorite bookmarking service if you think it is worth a mention, or subscribe to the newsfeed to learn of more great Blogger tutorials as they are posted.
 Blogger Buster

How Install Wibiya Toolbar Multi Function Widget

0 nhận xét
Many of my readers are asking for the fixed widget,which i am having at the bottom of my blog.It is by far best widget with useful features for a blog and is available in different colors to suit your blog.Best part is,its very easy to add and customize,The simple thing you have to do is just go to wibiya.com and sign up your blog there.Then they will get you approve your blog in 3-4 days and you will be ready to get codes for this widget from there site.You can select on the which features you want in your blog from below list and also select color of widget to suit your blog.

Features Of Wibiya Widget

1. Translator

2. Posts Navigator (Recent Article and Random Article)

3. Community via Facebook

4. Twitter Widget

5. RSS Subscribers Bar

6. Sharing Bar

7. Blog Searches

8. Photo Gallery

9. Live Notifications

10. Facebook Fan Page

11. Games (HeyZap)


Now How to get this widget.Just go to Wibiya.com

Then click on the Getit now button.


Now give your details and request an invite.


Then you will get an message from them.


Just wait for getting approved your blog for some days and after approve they will send you the invite to your email,just use that invite to activate your account and get that widget codes.

How to install widget from your account now.

Now When you receive invitation,then click on the invitation link from your mail and login to your wibiya account.

Fill in the details they are asking for.

Then you will go through 4 steps Process.

1.Create A Account 2. Select A Theme 3. Select Your Apps 4. Get It Now.

Just In step 1 Give the desired Information they asked For.

In Second Step Select the theme i.e color for widget which suits your blogger template.As while choosing theme at the right you have an option of Choosing toolbar icon.Use bloggers or any other you like.


In Third Step Select The Applications you want in your widget.As i have written all application at the beggining of the post.

In fourth Step You will get page like below.Just select the paltform and allow the popup to open in your browser as it will directly give you add a widget option in one step.As many readers have problem in getting codes of the widget, so its the easy one.


And after adding widget Just Hit Done.And you are to your dashboard Page with all stats for your widget and also a notifier option is there to set an message for your visitor whenever he comes to your blog.You can set it if you want.


Problem Users Facing To Implement In Blogger

1.In Getting Codes For Blogger


In The Fourth Step When You Select The Platform To Install the widget, There are four options.
1.Wordpress
2.Blogger
3.Typepad
4.Other Sites

Just when we click for blogger a new window opens for one click add a widget to blog.So for this you have to allow pop ups.If you are still not getting codes just select option for typepad or last option then you will get the script and place it in your Html/javascript widget of your blog.

And for wordpress you will get the download link for plugin just download it and install it.

2.Slowing Down Of Blogger


As one of reader didn't used it because of slowing down the loading of blogger.As for this the dror cedor from wibiya.com gave a simple solution to it as you can read his comment here.

What exactly you have to do is that how to start the loading of widget after blog gets loaded.For this here is the simple solution.

The code which you will get to be placed in blogger will be like this.


<script src='http://toolbar.wibiya.com/toolbarLoader.php?toolbarId=XXXX' type='text/javascript'></script>


Now what you have to do is just add &pl=1 in your link after you toolbar id as i have assumed here to be XXXX and make whole code look like below :-


<script src='http://toolbar.wibiya.com/toolbarLoader.php?toolbarId=XXXX&pl=1' type='text/javascript'></script>


What i have done is just added red part in link. By adding this the widget will load only after when the blog gets loaded, which will not effect the loading of blogger.

*Note:-If you are adding the script in widget its ok.But if then you adding in blogger codes it will not accept the script after making changes.So just make it code friendly from this Encode tool.

I checked this and really it had no effect on loading speed of my blog now.

I hope now you will have now no problem in installing the widget.
Anshul
  Sản phẩm mới của KNC